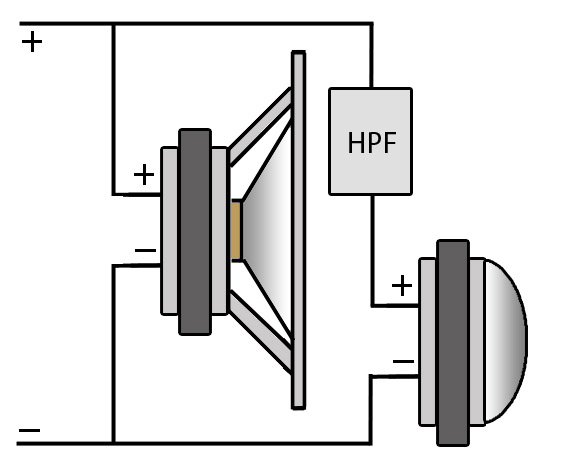
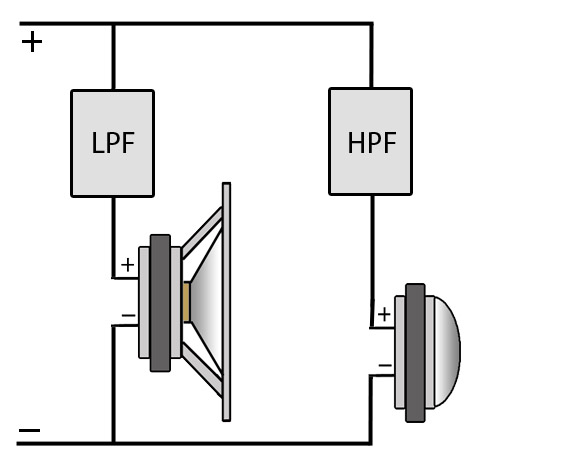
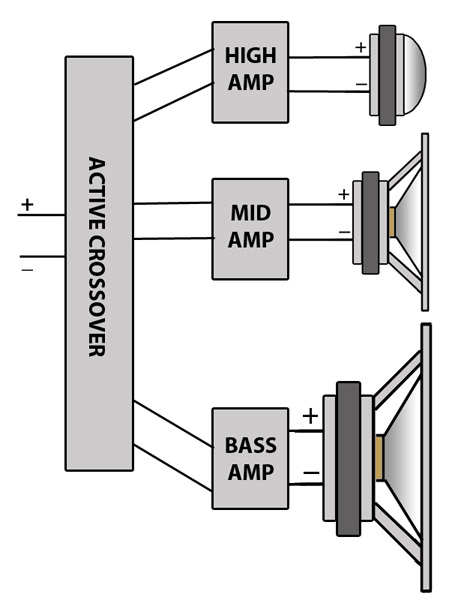
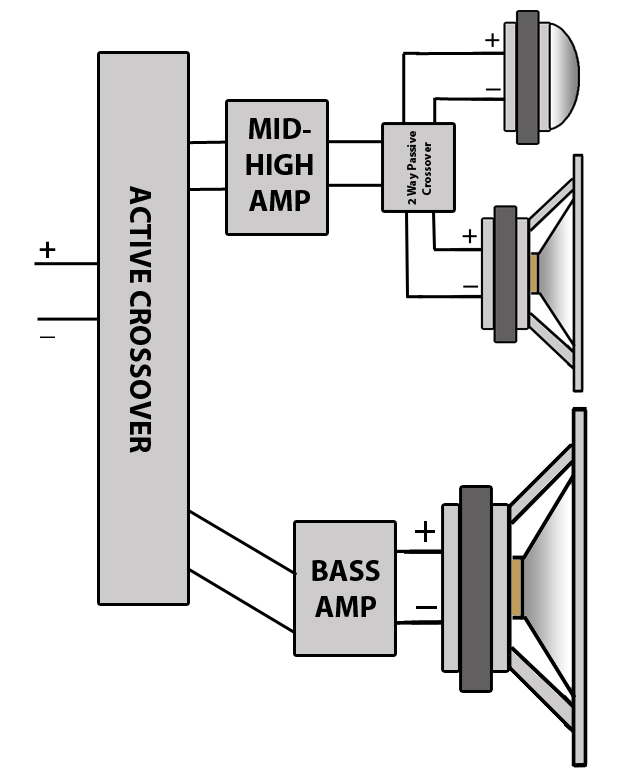
Some of the basics of crossovers have been covered in this article: https://speakerwizard.co.uk/loudspeaker-basics-crossovers-why-do-we-need-them/ – here we will go into a little more detail of how passive filters work, and give you the tools to design your own.
Crossovers and Filters
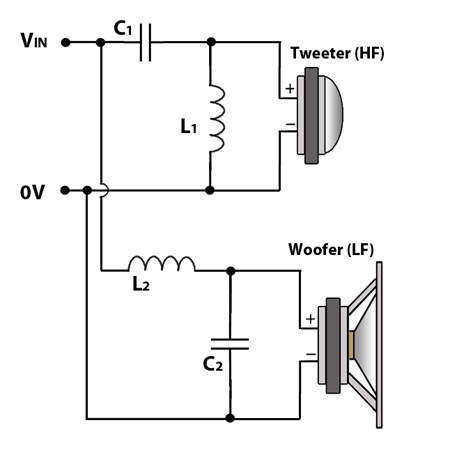
Lets’s start with a reminder of the basics, a crossover is a combination of high pass and low pass filters which split the signal into bands. The most basic crossover is a 2-way crossover, which splits the signal into 2 bands. Common configurations are 3-way and 4-way, which allow better matching of speakers with their appropriate operating range. 5-way active crossovers are not uncommon in large format PA systems in order to help cover as wide a frequency range as possible, as effectively as possible, to maximise various factors such as quality, dispersion, volume, as required by the design criteria. It is possible to keep splitting the audio range into smaller and smaller bands, but this can become an exercise of diminishing returns.
The Basic Building Blocks: Capacitors and Inductors
Capacitors: A Capacitor has a high ‘resistance’ (commonly known as reactance) to low frequency signals, and a low ‘resistance’ to high frequency signals. When combined with a resistor, you get a filter circuit, as shown in the diagram below.
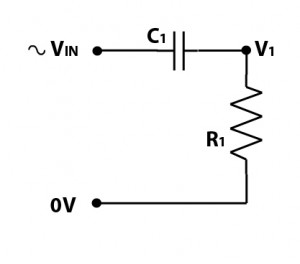
If you’ve ever looked at a high pass filter , and taken notice of the components, you might be wondering why you don’t have a resistor, its because the resistor in the above circuit is your loudspeaker. This is something to be aware of when using passive filters, that the filter DOES NOT work independently of the loudspeaker, the loudspeaker forms part of the circuit. If you change the load resistance from 8 ohms, to 4 ohms or 16 ohms, you change how the filter circuit works.
The diagram below shows the relative magnitude of the signal at point V1 with 0dB in the diagram indicating full signal. V1 is the Voltage that will be applied to the loudspeaker (R1). The cut off frequency in the diagram is 1kHz. We use dB scale for audio purposes due to how we perceive differences in volume of sound, a doubling or halving of magnitude is a significant enough change to be noticeable.
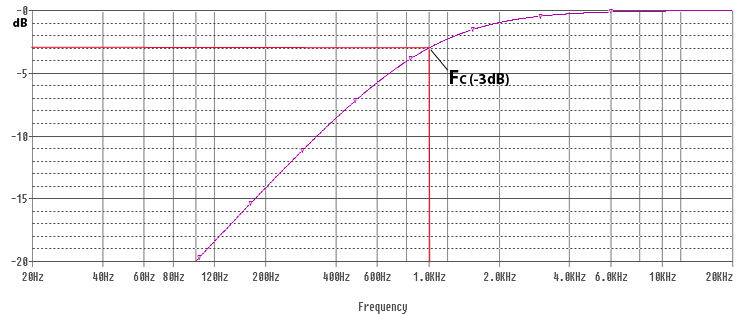
The filter has a cut-off frequency, commonly known as FC. Below the cut-off frequency, the capacitor has a high resistance, effectively blocking the signal. The purple line represent the magnitude of the signal that will pass through the filter. You can see that as the frequency reduces, the magnitude of the signal passing through the capacitor reduces. The point where the purple line crosses -3dB is at the cut off frequency, where the capacitor ‘resistance’ will be approximately equal to the resistor in the circuit. With the capacitor and resistor being roughly equal, the system will work as a voltage divider, with approximately half the input voltage across the capacitor, and half the voltage across the resistor (loudspeaker). FC is sometimes known as the -3dB point, where -3dB indicate half magnitude. Beyond the cut off frequency the capacitor reactance reduces, allowing higher frequency signals to pass unhindered. At these higher frequencies a ‘pure’ capacitor would have no effect on the passage of signals whatsoever, unfortunately pure capacitors are theoretical, and impossible to manufacture – any capacitor used in a filter circuit will also have a small constant resistive component and some inductance also – these contribute to distortion within the signal, as well as power losses. Higher quality capacitors are designed to be closer to a ‘pure’ capacitor and minimise losses and distortion within the capacitor.
Calculations for 1st order High Pass Filters
The resistance value (measured in ohms), and the capacitance (measured in farads) determine the cut-off frequency as per the following formula:

In our examples above , R1 is 8 ohms, and C1 is 20uF (microfarads). To use the formula above you need to use the capacitor value in farads, 20 uF = 0.000020 farads. Pi is the mathematical constant, you can use pi to 2 decimal places (3.14) for purposes of calculating filters. If you put the numbers into the formula, you’ll get FC of 994Hz.
As mentioned previously, the loudspeaker impedance forms a part of the circuit, if you try the formula you will notice that increasing the impedance from 8 ohms to 16 ohms will halve the cut-off frequency and reducing the impedance from 8 ohms to 4 ohms will double the cut off frequency. This is why you should only use a passive crossover or filter with the correct impedance load it has been designed to operate at.
We can change the formula to make it more useful, as we usually know what cut-off frequency we want, and what the resistance (impedance) is, but what we need to calculate is what value capacitor. This formula will yield the correct results:

You must use FC in Hertz, and NOT kiloHertz to get the correct answer.
If you’re not so keen on maths, you can use our calculator to help (kHz/uF units are handled automatically)
A first order filter is generally sufficient as a tweeter protector in an active system. You can add a capacitor in series to protect against DC Faults and/or accidental connection to a bass amplifier. You should make Fc of the capacitor one octave lower than the Crossover Frequency on your active crossover to avoid any problems. One octave lower is exactly half the freqency, so if your compression drivers are operating from 2kHz upwards, your tweeter protector should be selected to operate at 1kHz. The calculator above will give suitable results for this application. Some people would argue that is is better to use a 2nd order filter, due to the phase shift caused by the filter (We’ll discuss this in another article).
Multiple Capacitors:
When using capactiors in filter circuit, you should be aware that capacitors in series/parallel sum differently to resistances, in fact the rules for capacitors are opposite to how series/parallel resistances combine. Two equal resistors in parallel will halve the overall resistance, however two capacitors in parallel sum together. So two 10 microfarad capacitors in parallel are equivalent to one 20 microfarad capacitor. Two resistors in series, sum together to increase the resistance, capacitors in series give a smaller overall capacitance: two 10 microfarad capacitors in series will give an overall capacitance of 5 microfarads. Putting capacitors in parallel is a handy way of making up capacitance values that are not easily available off the shelf. You wouldn’t normally put capacitors in series in a filter circuit.
1st Order High Pass Filter:
A single capacitor when used with a loudspeaker, forms the most basic High Pass Filter, which is known as a 1st order filter. However, capacitors on their own are not enough to form crossovers, we also need inductors.
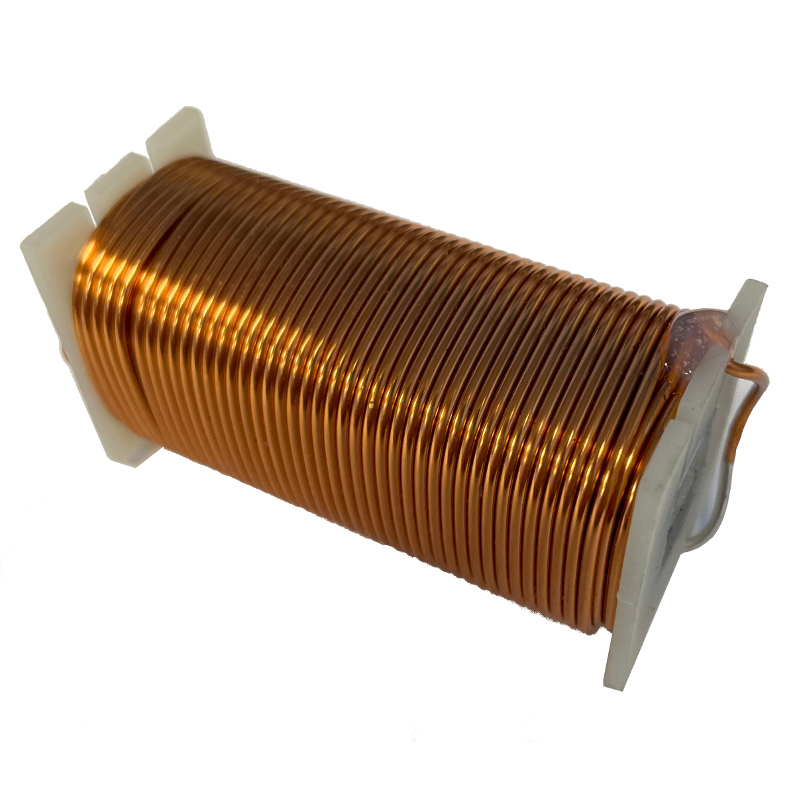
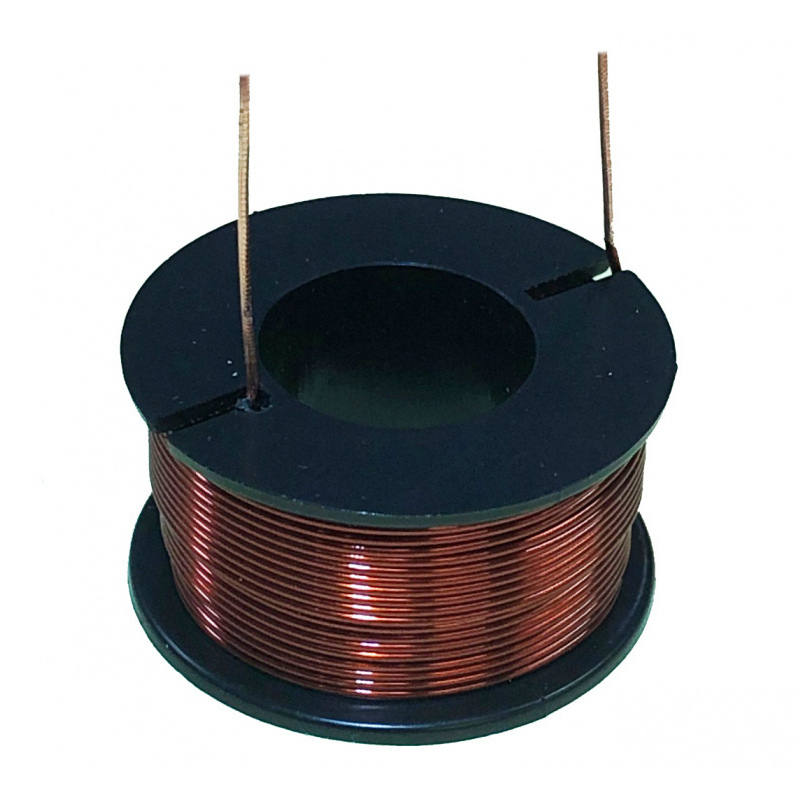
Inductors: Most commonly these are coils of wire, copper is most commonly used as it has a low DC resistance. In fact a straight copper wire would be what you normally use to connect up your speakers, so how does it form part of a filter? When current flows through a wire, an electromagnetic field forms around the wire, in a straight wire this field does not easily interact with other parts of the wire, so the effects are negligible, however, winding the wire into a coil creates a larger magnetic field. This magnetic field induces a voltage in the wire which opposes the current flow that creates it, this is often known as back EMF (electro motive force) So every time there is a change in current, the inductor creates a back EMF to try to stop the change in current.
An inductor has a low resistance to low frequencies. An inductor’s lowest resistance is it’s DC resistance, you can think of DC as a 0Hz signal. Inductors allow DC to pass, as once current is established, there is generally no change in current. Inductors block or resist AC, or alternating current, and an audio signal can be regarded as a form of AC.
The circuit below shows an inductor and a resistor, forming a simple low pass filter.
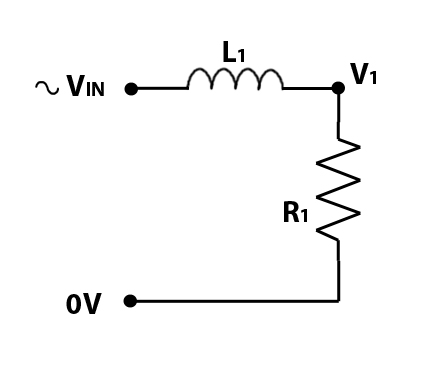
Again, the R1 is the loudspeaker, and L1 represents an inductor. For our example, we will make L1 equal to 1.27mH (milliHenries), which is written as 0.00127 H. With an 8 ohm loudspeaker for R1 we get the following frequency response:
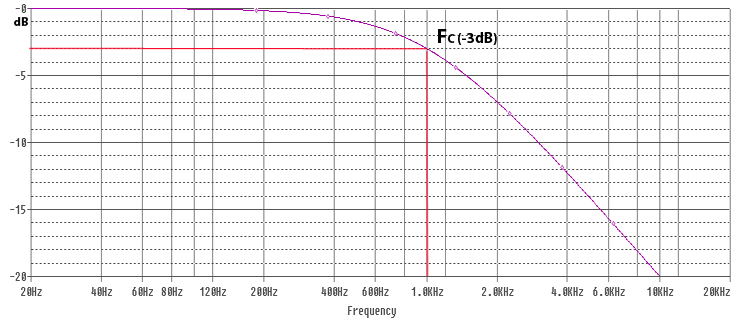
Inductors behave like resistors for purposes of summing their values. Two inductors in series sum together to create an equivalent bigger inductance in much the same way as two resistors in series are equivalent to a higher resistance. The formula for calculating the cut-off frequency is therefore different to the one for capacitors:

You can test the formula for our example, where R = 8 ohms, and L = 0.00127 Henries. You will get an answer very close to 1000Hz.
Re-arranging the formula makes it more useful, allowing the required inductance to be calculated for a desired cut-off frequency.

In that same way as it has not been possible to create the ‘perfect’ capacitor, there has also not been an ‘ideal’ inductor created to-date. The nearest that has been achieved is a supercooled inductor. All real world inductors have a series resistance created by the copper (or other metal) wire used to make the coil. This series resistance generates some heat, and causes losses in the circuit. Using an inductor with thinner wire will create more losses, so it’s best to choose an inductor with the thickest wire thats available and affordable in order minimise losses.
A single inductor in series with a loudspeaker forms the most basic Low Pass Filter, this is known as a 1st order filter. A low pass filter (an inductor) and a high pass filter (a capacitor) together form a crossover, splitting the sound two ways, with the bass passing through the low pass, and the treble passing through the high pass.
Simple 1st Order Crossover:
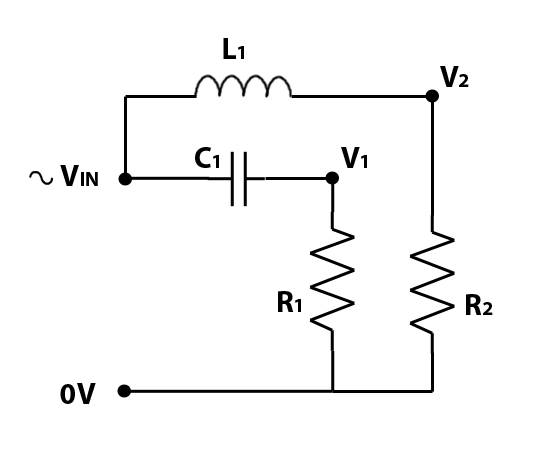
R1 represents a tweeter, operating at higher frequencies only, and R2 represents a woofer, operating at lower frequencies only. To create the above circuit, we have simply combined the circuits for the separate low pass filter and high pass filter. We’ll continue with the same component values of 20uF and 1.27mH, which will give the same cut-off frequency, and we’ll combine the two frequency responses into one graph.
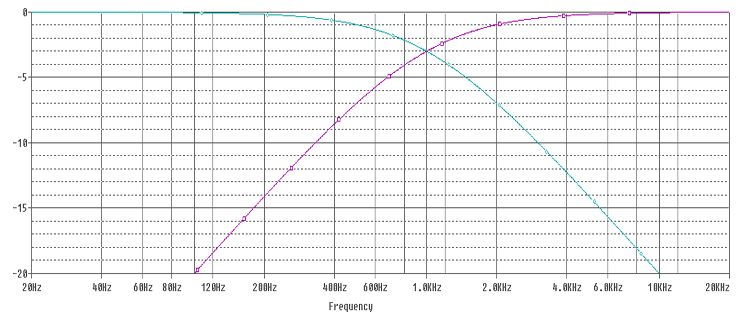
The blue line represents the frequency response of the low pass filter, and the purple line the frequency response of the high pass filter. You’ve probably already realised the significance of the crossover frequency, where the purple and blue lines ‘cross over’ each other and the graph probably starts looking quite familiar if you’ve ever looked into how crossovers work in the past. If nothing else, you should notice that the point where the two lines cross is at -3dB (half magnitude), if you sum the two responses together you are back at 0dB. So at the crossover frequency, both the woofer and tweeter should be producing the same sound, but each at half magnitude.
In a typical crossover, adding together the bass response and treble response should give you a flat response across the whole frequency spectrum – except there is a problem, inductors and capacitors cause phase shift, and a 1st order filter causes a 90° shift – inductors and capacitors cause phase shift in opposite directions, which would mean the bass and treble are directly out of phase with each other. Near the bottom of the frequency spectrum, you’ll have bass only, coming out of your woofer. At the top, you will have treble only, coming out of your tweeter. To some extent, it doesnt matter if these are out of phase with each other, as they are independent of each other and do not interact, however, around the cut off frequency, both the woofer and tweeter are creating the same frequencies, and if they are directly out of phase with each other, they can cancel each other out – bad news for creating a flat frequency response. With first order filters, this is fairly significant.
If you’re not sure what phase is, or what this means with respect to sound – we’ll cover this in a different article to be published at a later date.
The other problem with 1st order filters is that they are not that effective at splitting the sound, they reduce the magnitude of the stop band by only 6dB per octave, it can take two or more octaves to reduce the sound passed sufficiently, this means that quite a lot of treble still leaks into the bass, and a fair bit of bass leaks into the treble. For better quality sound, it is desirable to restrict frequencies to appropriate speakers, and to do this we need to use higher order filters. For passive crossovers, 2nd order filters are generally regarded as sufficient, occasionally with 3rd order filters used on the high pass only, to help protect tweeters from unwanted bass frequencies.
So how do we make a 2nd order filter?
If this is all new to you, you might think that you can just put two 1st order filters in series to create a 2nd order filter – in some parts of electronics this will work, passive RC filters can be cascaded to create higher order filters. With loudspeaker filters, the R is the loudspeaker, and you only have one of them, and it’s part of the circuit, so we have to be a bit more clever.
Its not possible to just use two capacitors in series, as these are just equivalent to one capacitor with a different capacitance. Two capacitors in series will just change the cut off frequency, it wont give you a 2nd order filter
To make a 2nd order order high pass filter, we start with our capacitor, but we then add a low pass filter (inductor) in parallel with our loudspeaker, as per the diagram below.
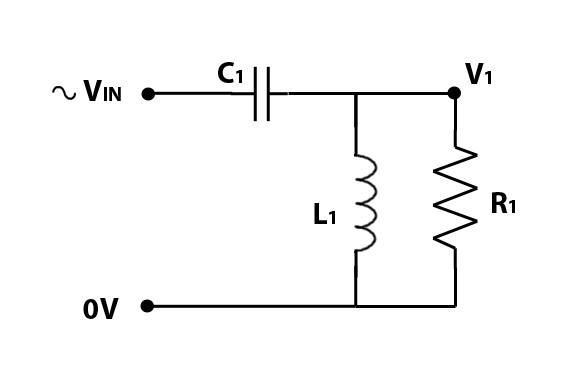
Frequencies below the cut off frequency are blocked by the capacitor, whats interesting is what happens around the cut-off frequency. With a correctly selected inductor, at the cut off frequency, the inductor blocks high frequencies, so these are forced to go through the loudspeaker, but the inductor allows frequencies at or below the cut off frequency to pass – creating a short cut , bypassing the loudspeaker. The result of the capacitor and working together at the cut-off frequency is to increase the slope from 6db/octave to 12 db/octave, a significant improvement.
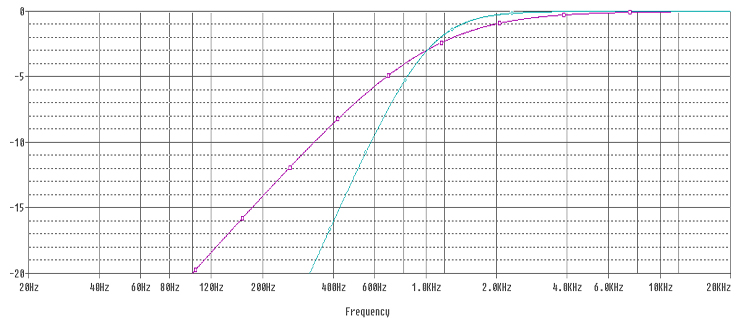
The purple line is the response from a 1st order High Pass Filter, and the blue line the response from a 2nd order High Pass Filter. Both are Butterworth filters. The 1st order filter is a 20uF Capacitor on its own, the 2nd order filter is a 14uF capacitor and a 1.8mH inductor.
You’ll notice the point the responses pass through the -3dB point remain the same for both filters. Selecting the correct values of capacitance and inductance is important for this to work correctly. Where both inductor and capacitor are active around the cut off frequency, the values of the inductor and capacitor have to be adjusted to make the filter operate in a desirable manner. The maths starts getting more involved, and unless you want to get into the finer points of crossover design, its probably easiest just to use one of the crossover calculators that are available online (we will be making ours live very soon)
In more advanced designs, it is possible to tweak the values to give a different Q. In a Butterworth filter the Q is 0.707, and these are the most commonly used filters in passive crossovers.
Amongst other things, different Q filters alter the shape of the ‘knee’, or bend, where the filters response changes from the stop band to the pass band. Changing the shape of the slope around the cut off frequency can have a significant impact on how the low pass and high pass signals sum. A shallower softer slope (such as a Bessel filter with a Q of 0.5) can result in a ‘hole’ in the response. An optimal slop, such as Linkwitz-Riley or Butterworth aims to keep the overall summed response flat across the crossover frequency. High Q filters, such as Chebychev are rarely used, as these will tend to give peaks in the frequency response, as well as other undesirable effects.
Higher order filters:
We can continue adding capacitors and inductors alternately to create higher order filters, as per the diagrams below:
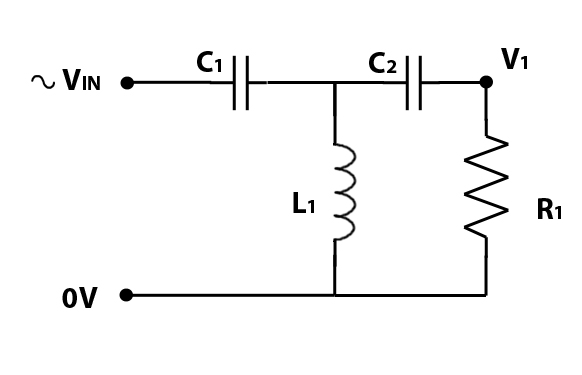
C2 is added to make a 3rd order High Pass Filter.
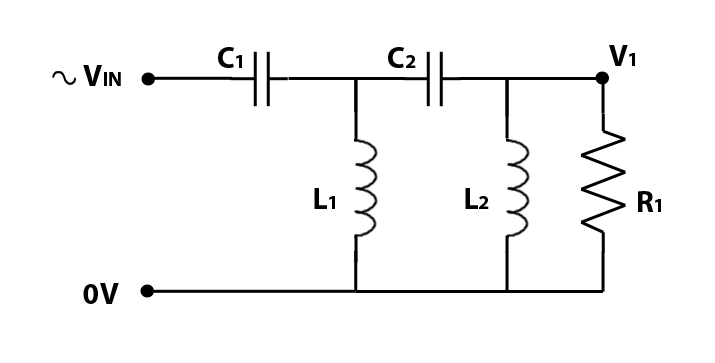
and then L2 is added to create a 4th order high pass filter.
In passive loudspeaker crossovers its rare to see filters higher than 4th order, and even 4th order filters are not very common due to the increased cost of additional components.
Higher order Low pass filters can also constructed in a similar manner to high pass filters, with the components working in a similar manner as high pass filters. In a 2nd order low pass filter, the capacitor acts as a bypass across the loudspeaker, creating a short-cut for high frequencies to skip past the loudspeaker. Where inductors and capacitors are efffectively ‘opposites’ of each other for purposes of passive filtering, to create a low pass filter, the positions of the inductors and capacitors within the circuit are swapped over. The diagram below shows a 2nd order low pass filter.
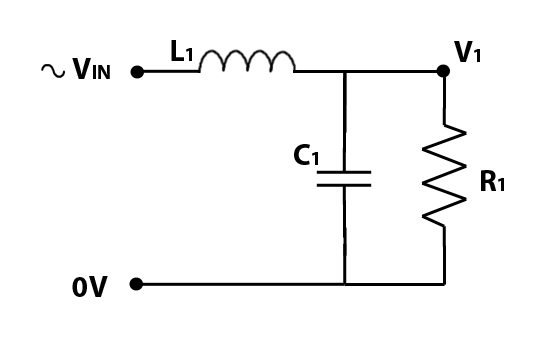 You can follow the same pattern to work out the configuration of 3rd order and 4th order low pass filters.
Depending on the crossover design, you use corresponding low pass filter and high pass filters to achieve the desired result. If you’re new to this, I would suggest sticking to 2nd order filters on both the low pass and high pass section.
Beyond Passive crossovers?..
If you’ve understood all of this, you should now know how passive filters and crossovers work. Many early active crossovers used the same principles, but using just RC filters with op-amps in order to split the signal before it reaches the power amplifier stage. Many early active crossovers had fixed frequencies, and could not be easily adjusted, a common means of customisation was to have plug in modules, with different capacitors and resistors relating to different configurations of frequency. Innovations in circuit design and improvements in component availability allowed variable frequency active crossovers to be built, back in 1990s, I recall the Rane AC23 becoming available, this was regarded as a high quality, but affordable variable frequency active crossover, I seem to recall they cost around £300, which back in the mid 90s wasnt cheap! A few years later, designs similar to this started becoming commonplace in the industry, and are now used in virtually all variable frequency analog active crossovers that are commercially available today, with prices now in the £50-£100 range.
The revolution in digital processing has now surpassed this, and most people prefer digital signal processing for active crossovers, mainly due to the massively increased versatility.
Filed in Crossovers, Loudspeaker Basics | Tagged: 1st Order, 2nd Order, calculator, Capacitor, Crossover, Cut-off Frequency, FIlter, Formula, Hertz, High Pass, Impedance, Inductor, kilohertz, Low Pass, Passive, Passive Crossover
